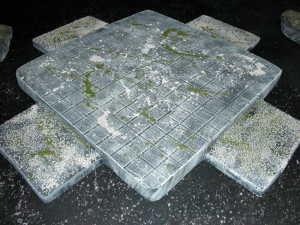
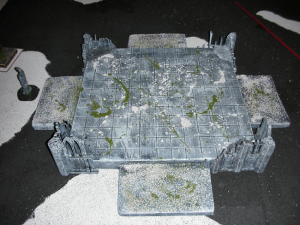
The ruined platform was one of the first ‘large’ pieces we decided to create, it allows for the battle field to be broken up into a couple of different areas. Either by placing this inside of the middle of the board or by placing it to either side. So to create this platform you will need the following supplies
- 1″ polystyrene (22″ x 22″ square)
- A ballpoint pen or dull pencil (to draw the blocks on top)
- A cutting instrument
- Paint
- Dark Grey
- Light Grey
- Black
- White
- Flock
- Green
- Grey
- Sand Paper
- White Glue
- Water
- OPTIONAL: GW Plastic Ruins (we used them on all 4 corners to help dress up and adjust the playability of this piece)
To start this project you will need to cut a 22″ square piece of polystyrene. From here you’ll want to measure out the ‘steps’ that will be on all 4 sides. In this case, we used 2 heavy jacks wide as a unit a measurement or about 6 inches wide for each step and roughly 4 inches deep. With a pieces like this, you will want to draw this all out before cutting anything. In the picture below you can get a rough idea of the shape of the piece (sorry for the lack of stepwise pictures for this).

Some things to note; we drew small square blocks on the center portion of the platform, we drew nice 3/4″ squares in a grid on top, each step on all 4 sides are 1/2″ and sanded smooth, and we also made some knicks and marks on the top to rough up and weather the surface some. Please know that when you make 3/4″ squares on a large piece like this, you are essentially making a rules that sites on the top of the board….we didn’t think of this ahead of time. Moving forward we sanded all sides and prepped it for paint. The order of paint goes as follows;
- Black base coat (we used 2 coats on this piece)
- Dark Grey (I had the local hardware store match a quart of GW’s Codex Grey)
- Light Grey (I had the local hardware store match a quart of GW’s Fortress Grey)
- White
Each coat is progressively lighter and we utilized a technique called ‘dry brushing’. This technique involves using little paint on the brush and lightly coating the piece one color at a time. With each step you want to get lighter and lighter with the amount of paint you use to cover the piece. The idea behind it is that you get a blend of color and white will provide the highlighting to the piece. See picture below for and example of this.

This technique gets uses very heavily through out all of our projects as you’ll come to see. After all the paint has dried we started the flocking process. On this pieces we didn’t want to just flock the entire thing, rather, we wanted to have it ‘here and there’ as you can see in the pictures. For each step we mixed water and white glue together to make a thinned out glue. This was then brushed on the entirety of each step and then lightly sprinkled the grey flock onto it. After that dries we used a straw and some regular non-thinned out glue. We drew up a bit of glue into the straw and then blew it back onto the platform. We did so 4-5 times and then added the grey flock to those areas. We repeated this process with a small amount of green flock as well. and the finished product is pictured below.
